Application Builder
To create or edit a application, you must use the desktop version of HOA GO. You cannot create or edit a applications with the mobile version. If you don't have the desktop version, you can download it here.
Applications are used by your HOA's homeowners to get approval from the HOA when it is needed. For example, your HOA may require that a homeowner submit plans and designs for the installment of a pool. Or, they may need approval by the HOA for landscape and/or hardscape improvements to thier home. The entire application and approval process can be done intirely in HOA GO. This area allow you to define the content of each application your HOA uses, and other functionality of the application like which committee will approve each application and the content of the approval certificate.
A NOTE ABOUT PREVIOUSLY STARTED OR COMPLETED APPLICATIONS
Once a homeowner starts an application, any changes you make to the application [template] will not be applied to the already started application. Also, any previously submitted or approved applications will also not be updated. Changes you make to the application template only apply to new homeonwer applications.
The Application Builder Window
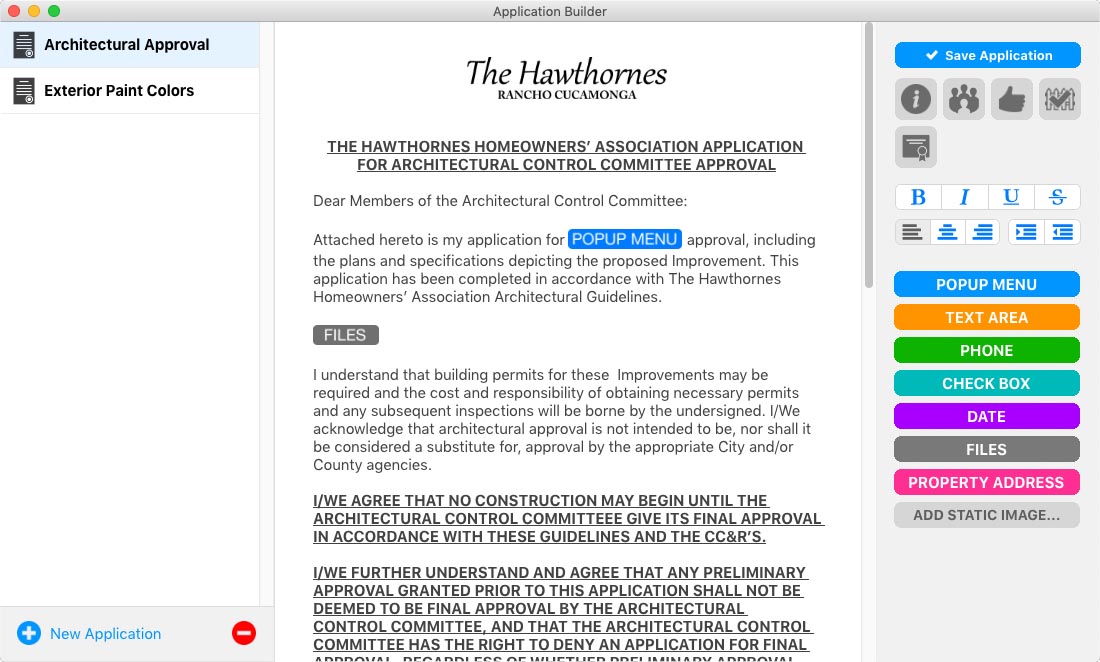
Application Builder Window consists of three main sections: the Application list on the left, the Application editing view in the middle, and the content options panel on the right.
The Application List
This area lists the existing appliations. Click an application from this list to load it for editing.
To create a new application, click the New Application button and enter a name for your new application.
To edit the name of an appliation, double-click the application in the list and enter the new name.
To remove an appliation, select the application in the list and click at the bottom of the application list.
The Application Editing View
The middle area of the screen shows your application. Type the text that will make up your application in this area. Use the items in the Content Options area on the right to add user-entered and dynamic data to the application.
The Content Options Panel
This area on the right of the screen, provides many options and data options to add to your application.
Save Application
Click this button anytime you want to save the application.
 Application Description
Click this button to add the application's description. This will be seen by the homeowner to help them pick the correct application. This should be short and brefly describe the purpose of the application. For example, "Use this application for hardscape, pools, and other home improvement projects." or "This application is for reserving the North Clubhouse".
 Committee Selection
Click this button to select the committee that will review and approve/deny the application. If no committee is needed, then select "No Committee Approval Needed". In this case, you will approve/deny the application yourself. For details on creating and editing HOA Committees, see Creating HOA Committees.
 Committee Approval Threshold
If a committee is selected in the Committee Selection, then you can set the number of votes needed for this application to be approved. For example, if you set the threshold to 3, then as soon as 3 committee members approve the application, the application will be considered approved.
 Neighbor Awareness
Some applications require that homeowners get proof that they have made thier neighbor(s) aware of thier application. This is often the case in choosing paint colors or hardscape that may effect a neighbors enjoyment of their street or neighborhood. Click this icon to check it and then the homeowner will be required to select thier neighbors for neighbor awareness. In this case, the selected neighbors will be notified in the HOA GO app that thier neighbor is submitting an application. The neighbor will be able to review the completed application and denote that they have seen the application. The neighbor cannot deny the application, but they can make notes for the committee to review. Once all selected neighbors have responded, the application will be submitted to the HOA.
 Application Certificate
Sometimes, a contractor won't start a job until they know the homeowner's plans have passed the HOA Board. The Application Certificate is automacically issued to the homeowner when thier application is approved. The homeowner can print or email it to whomever needs proof that the HOA has approved the application. Click this button to edit the content of the certificate. See Creating the Application Certificate below for details on creating the certificate.
Text Styling
To add text styling, select the text and click the appropriate style. You can set text to bold, italic, underline and strikeout. You can also justify text left, center or right. Lastly, you can indent a paragraph.
Input Data Fields
You can add a variety of areas on your application for the homeowner to fill out. When the homeowner submits their application, HOA GO will verify that all the data is complete for each data type. For example, if you addd a PHONE area, HOA GO will make sure the phone number entered is property formatted and isn't missing any numbers. Other types will react accordingly. For instance, if the user clicks on a DATE area, a calendar will appear for them to choose a date.
To add a data field, simply place the cursor where you want to add the field. Then, just click the data type you want. Some types have additional settings to them. To set or edit those settings, just click the data type in the Editing View and the options will appear at the bottom of the Options Panel.
POPUP MENU
Use this option to give the homeowner a popup list of options to choose from. When you add or select a POPUP MENU field, "Popup Menu List" will apear at the bottom of the Options Panel. Enter the list of options into the "Popup Menu List" area.
Add this option to allow a place for the homeowner to add any text they want. This is useful for areas like, "Please give a descriptions of your proposed improvements:". PHONE
Add the PHONE field to give the homeowner a place to add a phone number. HOA GO will verify that the data they enter is complete and a properly formatted phone number. CHECK BOX
Add the CHECK BOX field for areas that require a check. For example, you might say something like, "Please check all that apply:". DATE
Add the DATE field to give the homeowner a place to enter a date. HOA GO provide the user a calendar to select a date. The homeowner cannot enter an invalid response. FILES
Add the FILES area to give the homeowner a place to upload files or photos. The homeonwer can enter multiple files. PROPERTY ADDRESS
The ADDRESS area is unique in that it is not filled out by the homeowner. This option will be replaced with the homeowner's address. This is a nice convienience as the homeowner won't have to fill in data we already know. ADD STATIC IMAGE
Use the ADD STATIC IMAGE area to place an image in the application. This image is not editable by the homeowner. Typically, this is used to your HOA's logo, sample diagram, or any other reason a image may be needed.
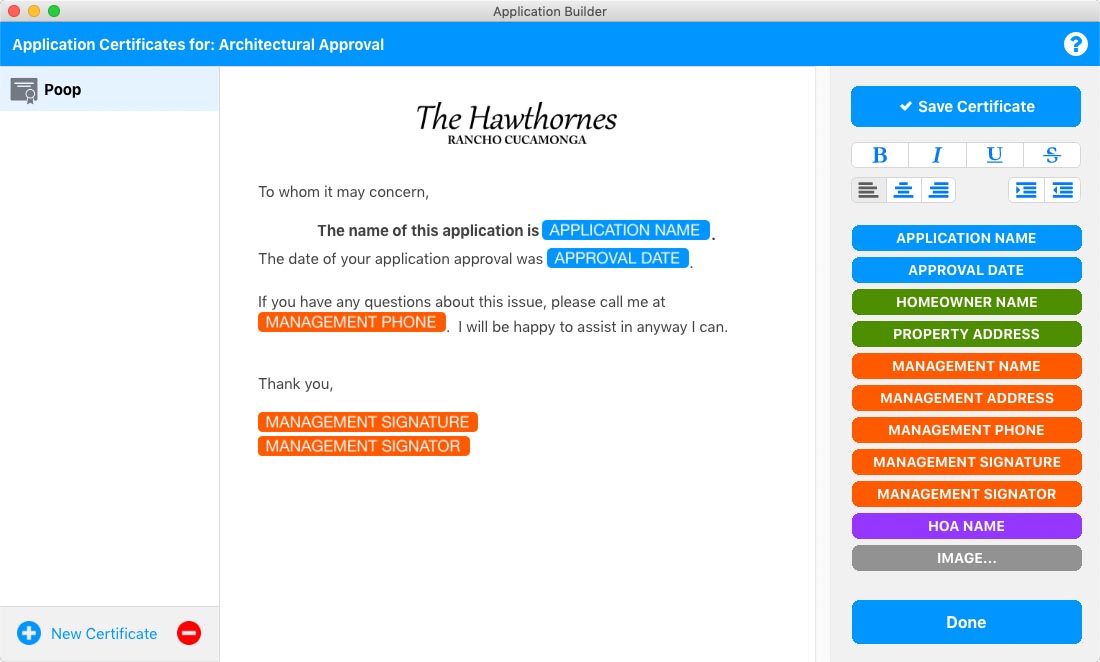
Creating the Application Certificate
After clicking the Application Certificate button, the Application Certificate window will open. Use this area to create the certificate. You can create as many certificates as you need for each Application. Keep in mind that Application Certificates are read-only and do not contain any user-editable parts.
To create a new certificate, click the New Certificate button and enter a name for your new certificate.
To edit the name of an certificate, double-click the certificate in the list and enter the new name.
To remove an certificate, select the certificate in the list and click at the bottom of the certificate list.
Use the middle area to compose your certificate. Add whatever data you want.
Save Certificate
Click this button anytime you want to save the certificate.
Text Styling
To add text styling, select the text and click the appropriate style. You can set text to bold, italic, underline and strikeout. You can also justify text left, center or right. Lastly, you can indent a paragraph.
Prefilled Data Options
These options allow you to add dynamic data to the certificate. To add a data field, simply place the cursor where you want to add the field. Then, just click the data type you want.
APPLICATION NAME
This option will be replaced with the name of the application.
APPROVAL DATE
This option will be replaced with the date the application was approved.
This option will be replaced with the name of the homeowner. PROPERTY ADDRESS
This option will be replaced with the address of the property. MANAGEMENT NAME
This option will be replaced with the name of the property manamgement company (if there is one). If your HOA is not using a management company, this option has no purpose. MANAGEMENT ADDRESS
This option will be replaced with the address of the property manamgement company (if there is one). If your HOA is not using a management company, this option has no purpose. MANAGEMENT PHONE
This option will be replaced with the phone number of the property manamgement company (if there is one). If your HOA is not using a management company, this option has no purpose. MANAGEMENT SIGNATURE
This option will be replaced with the signature of the HOA's Administrator. This signature is set in the Administrator's Account screen. MANAGEMENT SIGNATOR
This option will be replaced with the name of the HOA's Administrator. HOA NAME
This option will be replaced with the name of the HOA. IMAGE
Use the ADD STATIC IMAGE area to place an image in the application. Typically, this is used to your HOA's logo, or seal of approval or completion.