Meetings: Creating A New Meeting
To create a new meeting, you must use the desktop version of HOA GO. You cannot create or edit a meeting with the mobile version. If you don't have the desktop version, you can download it here.

Set Meeting to Edit Mode
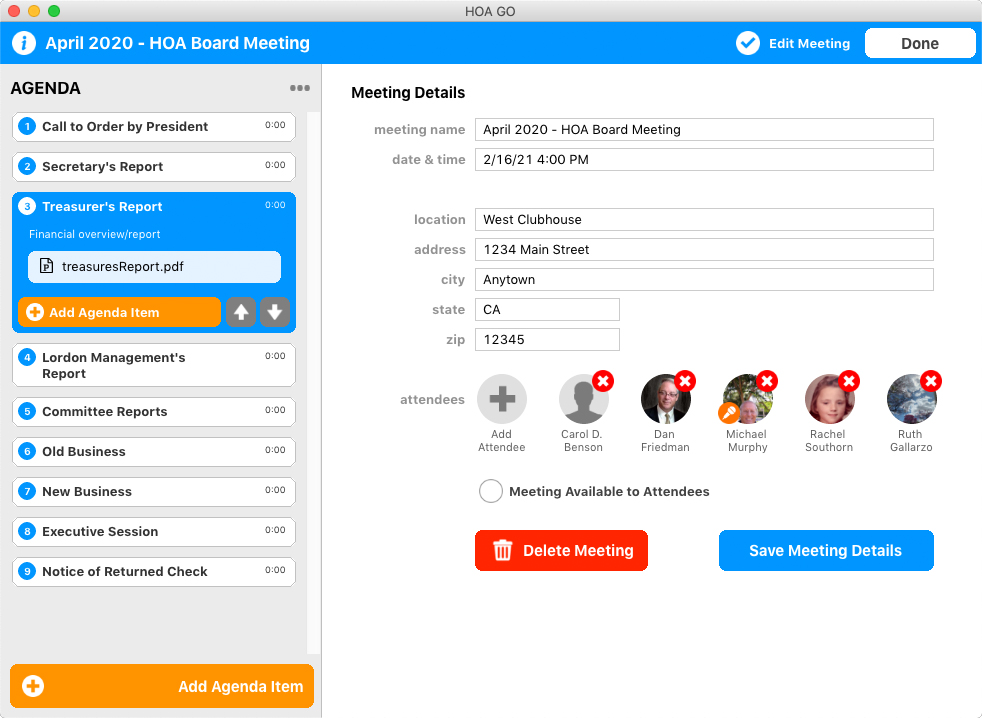
When a meeting opens, it opens ready to begin the meeting. To edit the meeting, you need to set it to edit mode. On the let side of the screen, check the Edit Meeting button. Now you can edit any part of the meeting.
Setting Meeting Details
Tap the "i" at the top-left of the screen to open the Meeting Details window.
Meeting Name - Enter the name of the meeting. Your meeting attendees will use this name to identify the meeting.
Date & Time - Click in this field to select the date and starting time of the meeting.
Location - Enter the name of the location for the meeting. For example, the name of the building or resturant where the meeting will be held..
Address, city, state and zip - Enter the address of the meeting.
Attendees - Attendees are those who are invited to join the meeting. If you are not listed as an attendee, you cannot participate in the meeting in HOA GO. In a typical board meeting, you would include the board memebers, the HOA Management Company (if you have one), the minute taker, etc. Even though they might be at the meeting, you would not include all residents and guests.
Click Add Attendee and choose the appropriate option: "Add HOA Resident" (select a specific resident of the HOA), "Add Management or Vendor" (adds a member of your HOA's Management Company or a vendor), or "Add Committee Members" (choose a committee to add all members of that committee).
You can remove a attendee by clicking the red X next to thier photo.
Each meeting needs a leader, someone that will run the meeting. The other attendees will see on thier screen what the leader has on thier screen. This helps eveyone stay on the same page. To set the meeting leader, just tap their photo. The orange microphone icon denotes who the leader is.
If the Meeting Available to Attendees option is checked, then the meeting is enabled for attendees to join. It's best to leave this option unchecked until the setup of your meeting is complete.
Creating the Meeting Agenda
The Agenda sets out the list of items to be discussed at the meeting. Typically, items on the agenda must be decided before the meeting begins.

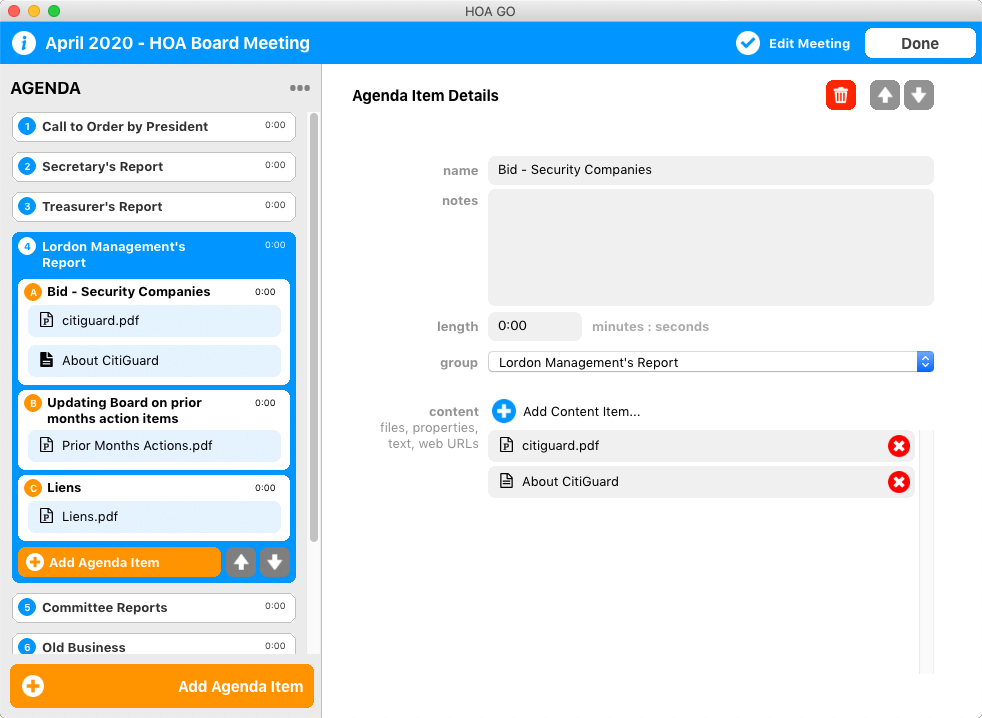
To add an agenda item, click the Add Agenda Item button. When the new item is added, or when you select an existing agenda item, you will see the Agenda Item Details panel. This is where you define the contents of the agenda item.
Name
Enter the name of the agenda item. For example, "Secretary's Report", "Call to Order", or "Review of Landscape Bids".
Notes
Enter any notes for the agenda item. This could be anything you want. Example, "Barbara will read the report", or "This item was placed on the agenda by Bill.".
Length
Enter the intended lenth of time to be spent on this agenda item.".
Group
The group option is used to collect one or more agenda items together. For example, you might group several agenda items together as "Old Buisness", "Executive Session", or "Concrete Bid Review".
To create a new group, simply choose "New Group" from the Group popup menu. To group multiple agenda items to the same group, set each agenda items to the same group.
Content
This area is used to attach files, images, websites, and more to a agenda item. When the meeting is running,attendees will have access to the items you include.
To add content to the agenda item, click the Add Content Item  button. Choose which type of content you want to add:
File
You can select images, text documents, or PDFs.
Property/Homeowner
Use this option to reference a specific property. For example, if you are discussing a homeowner who is behind on thier dues, including the property will allow attendees to eaisly view details about the property.
Text Block
Use this option if you want to enter text or paste text.
Web Address
You can enter a web address for attendees to view. For example, if you are discussing purchasing purchasing a specific item, you could enter the address to that item on Amazon.
To remove a content item, click the next to the item you want to remove/
To add an agenda item inside of a group, click the Add Agenda Item button within the group.
You can move agenda items up and down within a group by clicking the agenda item and then clicking the , or buttons in the Agenda Item Details area.
You can move agenda groups up and down within the agenda by clicking the , or buttons in Agenda Group.
